Tuning Up a Lathe
|
The information shown on this page was compiled by Sandy Campbell in response to a post on the Unofficial Mamod and Other Steam Forum, it has been reproduced here with his permission.
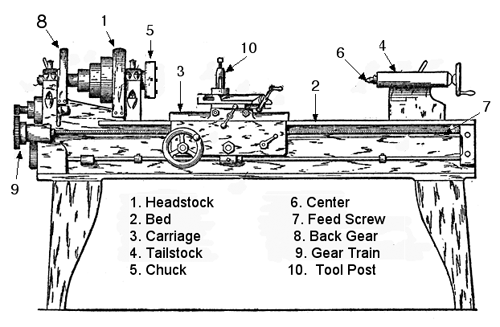
Aligning HeadstockEither a test bar or Rollie,s_Dad,s_Method will suffice for ensuring that the lathe spindle is accurately aligned with the ways of the bed... thus ensuring parallel turning. Neither methods will ensure that the lathe spindle is exactly on the centre line of the lathe bed... merely parallel to it. Following headstock/bed alignment using either of the above methods a trial cut should be made. Put a piece of round bar of at least 1" in dia and about 6" long in the chuck and turn the whole length (apart from the bit in the chuck) down with a cut of say 0.010" - 0.015" (0.254mm - 0.381mm) without the use of the tailstock. Then take another cut of similar depth but leave a collar at both ends about 1/4" (6.35mm) wide at the original dia. Then take a fine cut accross both of these collars of about 0.002" (0.058mm) without touching the tool or the cross slide. Measure the dia of the 2 collars... they should be identical... if they are not then you need to do a minor change to the alignment. If the collar at the tailstock end is larger then you need to add a shim under the front foot of the bed at the tailstock end... if this collar is smaller add a shim to the back foot at the tailstock end. If shimming is necessary, take a further fine cut accross both collars and measure again... repeat until both collars are the same dia. Your bed and headstock are now parallel. Mark the centre of the NUMBER 1 JAW of the chuck on the end of the bar (so you can replace it in the same position later) and take the test piece out of the chuck... store it somewhere safe as it will be usefull for any future re-alignment. Aligning Tailstock . Take your tailstock off of the lathe and turn it upside down... you will see there is a large block and a smaller block parallel to each other, with a small gap between them. You should also see, in the side of the tailstock, a square key and a grub screw hole... there should be a similar grubscrew on the other side opposite... these are the grubscrews you adjust for centering the tailstock... loosen one and tighten the other in the direction you need to move... once set correctly snug both grubscrews up to lock the adjuster. If you have a ground test bar this is quite easy since it will have centres drilled in both ends. Remove the chuck and fit a dead centre in the lathe spindle... fit another dead centre in the tailstock barrel (remove the chuck). Mount the test bar between these centres and tighten gently using the tailstock handwheel. Without touching the cross slide setting... move the carriage of the lathe until the dial indicator is at a point near the tailstock end of the test bar... take note of the dial reading. If the reading has increased... adjust the tailstock (there is usually a set of grubscrews fitted back and front for this... slacken one and tighten the opposite one in the direction required) towards the FRONT of the bed to bring the reading back to zero. Return the carriage to the spindle end and repeat all the above measurements until you can move between spindle and tailstock with no change in dial reading. Setting Tailstock Without a Test Bar Note... you can also use the following test to confirm accuracy of setting the tailstock using a test bar... if you feel it is necessary... it won't do any harm and can provide you with a second home made test bar for future use. Take a piece of round bar at least 1" (25mm) in dia and having a length of at least 2/3rds the max distance between centres of your lathe. Remove the lathe chuck and fit a dead centre into the lathe spindle and also a between centres drive plate/faceplate with a drive pin fitted to it... fit a second dead centre onto the tailstock barrel and then fit the bar between these centres with a drive dog attached to the bar at the spindle end... use a little grease at the tailstock centre and apply a little pressure using the tailstock hand wheel... lock the tailstock barrel. Take a small depth cut (0.010" (0.254mm) or so) along the bar starting at the tailstock end and repeat until you have a finished cut over the whole length of the bar (except for the bit where the drive dog is fitted). Using a micrometer... measure the dia of the bar at the spindle end and write it down... then measure the bar at the tailstock end and again write it down... take a note if this second reading is smaller or larger than the first one. Subtract the smaller reading from the larger reading and write down the answer... this will be the total amount of taper. If the second reading was smaller than the first then the tailstock needs to be moved towards the BACK of the lathe bed by the calculated amount... a small dial indicator against the back face of the tailstock body will help here. If the second reading was larger than the first then the tailstock needs to be moved the calculated amount toward the FRONT of the lathe bed. Take a further fine cut say 0.005" (0.127mm) along the bar and repeat the above sequence until you arrive at a zero difference in the two end readings... JOB DONE. Save this test bar along with the first one for later use. Hope this makes things clear. Best of luck Sandy. |
` |
